Wednesday, July 31, 2013

Last few construction photos

One afternoon I received this very excited email from Kirk Sand: "I just strung it up, and it sounds great! Right away! I can't wait to get the electronics in it!"


Here are a few more photos he sent that day. First, installing the Prismatone pickup . . .


A perfect fit! Kirk fashioned the bridge to receive the Prismatone without the need for intonation adjustment screws.


Now, stringing it up . . .


Beautiful! Kirk used D'Addario ProArte Extra Hard strings, with a Savarez Alliance 3rd string.


Here's a closeup of the bridge/pickup area.


And a view through the access panel.


Looking good!


Now, deciding on the input jack location. Endpin or side?

Next time- installing the preamp and wiring!

-Craig

Sunday, July 21, 2013

Gluing the bridge

I told Kirk Sand about 12-year old me gluing the bridge down on my old Harmony archtop guitar with some glue I found in my Dad's workshop, because it kept sliding around. (The bridge, not the workshop.) Don't worry, I marked the spot before I glued- by cutting a notch in the top of the guitar on each side of the bridge feet with a knife I found in my Dad's workshop . . .

Later, I received these photos, with the caption: "Gluing on your bridge with some glue I found in my Dad's workshop."

First, measuring for the right spot.


A trial run. The ebony block simulates the pickup, for precise placement.


Looking good. Hopefully, Kirk won't mark the spot with a knife he found in his Dad's workshop . . .


Kirk explains: "First we have to chisel away the lacquer where the bridge goes. Better measure twice, chisel once!" If you look closely, you can see the faint lines where he scored the bridge outline before chiseling.


Positioning and taping the bridge into place.


Drilling for dowels and the pickup wire.


Ready to glue.


Next time- the last few construction photos!

-Craig


Thursday, July 18, 2013

Nut and tuning machines

Kirk sent me this fun photo of the stages of making the nut, from the large chunk of wooly mammoth ivory to the finished nut (sitting just in front of the sound hole).


Here's the finished nut, #642.


The nut installed, but not yet notched. Kirk does beautiful work- a real artist and craftsman, down to the finest detail.


And a side view . . .


We decided on gold Hauser-style tuners with ebony knobs, from Schaller.


Here's a test fit. Looks great!


And a closer view . . .


The headstock design, Brazilian rosewood head plate, Schaller tuners, and ivory nut- gorgeous!


Next time- gluing the bridge!

-Craig

Monday, July 15, 2013

Buffing and sanding the finish

So, how does Kirk Sand finish a guitar? I'll let Kirk tell you:

"I apply 4 coats (of lacquer) and then sand with 600 dry paper. Then I spray 4 more coats, and sand again with 600 dry."


"I then spray 4 last coats and let it dry for as long as possible. That isn't easy when you have a show coming up in 3 weeks."

Note: That's 12 coats, folks. 


"So, after sanding the lacquer finish all the way up to 2000 wet, I buff it out on my miracle buffer."


Here's a closeup of Kirk's buffing wheel.


And one more photo of Kirk at work. Notice the blue tape to protect the fingerboard.


The result- a beautifully finished instrument, front . . .


. . . and back.


Next time- nut and tuning machines!

-Craig

Saturday, July 13, 2013

Making the bridge

While the first coat of lacquer is drying, Kirk turns his attention to the bridge . . .

"Any ideas on the shape?" he asked me. My ideas were something along the lines of John Knowles' bridge, but with swept wings to echo the angled fingerboard and heel, and the Brazilian rosewood wedge on the back. "I'll think on it," said Kirk. "The ends of the wings can be traditional square flat on the ends. I curved John's in a little. I'll play with curving the ends the opposite way."

Here's John's bridge:


And here's the rough drawing I sent to Kirk:


A couple of days later, I heard from Kirk. "It came to me in one second today. What do you think?"


"It is similar to John's, but not the same. It has the straight ends like your drawing. It mimics the other lines on the guitar too!" (That's the Prismatone pickup next to the Brazilian rosewood bridge blank.)


I gave Kirk the go ahead, and he went to work. First, he created an inlay for the tie block, using the same scheme as the soundhole ring and binding.


The finished inlay, ready to install . . .


. . . and a closer view.


Done! The tray will receive the Prismatone pickup.


Now, Kirk lacquers the bridge . . .


. . . and sets it aside to dry.


Next time- buffing and sanding the finish!

-Craig

Tuesday, July 9, 2013

Frets and finish (and a little striptease)

While discussing fret size with Kirk (we went with tall frets, like Chet preferred), I received an email- from my guitar.

"Hi Craig! This is your new guitar writing to ya. I just got all my makeup on and I'd like to do a little striptease for you. OK? Hope you enjoy it!"

"A picture is worth a thousand words" as the old saying goes, so I'll let my guitar do the talking . . .


I hope you enjoyed the show as much as I did! By the way, the blue tape isn't for modesty- it's to keep the lacquer off the fingerboard and frets (and out of the guitar).

Next- making the bridge!

-Craig


Sunday, July 7, 2013

Making the fingerboard

One day I received this cryptic email from Kirk Sand:

"I am having a creative moment on the end of your fingerboard. I want you to see this and tell me what you think."


Kirk had the idea of an angle at the end of the fingerboard, to echo the Brazilian rosewood wedge on the back. Here's the original fingerboard template:


Long story short, I thought it was great. Kirk made a mock-up to give me a better idea.


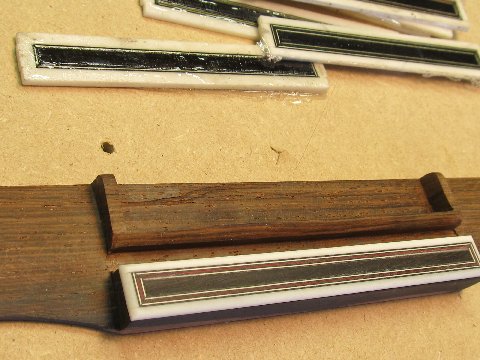
And a full size mock-up, cut from a length of blackboard.


Then, he had another creative moment, this time at my heel . . .


Why not cut the heel at an angle, to match the end of the fingerboard (which echos the Brazilian rosewood wedge on the back)?


I agreed, and here is the result. First, the heel . . .


. . . and now, the fingerboard.


The 12th fret inlay (my initials) came from an idea we tossed back and forth. I like the symmetry of the letters in this font- it looks more like a design than initials.


Here's the mock-up I sent Kirk. (It looked so good, I left it on for a couple of weeks. The further away you got, the better it looked- kind of like me.)


Here's another photo of the actual inlay.


Next time- frets and finish!

-Craig