Showing posts with label ebony. Show all posts

Thursday, September 26, 2013

Now you can have one too!

I took delivery of my new guitar in July at the CAAS (Chet Atkins Appreciation Society) convention in Nashville. It's incredible!

Here's a video of the first time I played it, in the Sand Guitars display room at CAAS.


And here's a poster from the convention.


The text reads:

• Sitka spruce top
• Mediterranean cypress back and sides
• Brazilian rosewood back wedge and lining
• Brazilian rosewood trim
• Prismatone pickup and preamp
• Schaller tuners with ebony buttons

Here's another photo of the guitar, taken by Kirk himself.


. . . and from the back. Did I mention the Brazilian rosewood wedge?


I recorded a couple of audio clips so you can hear both the acoustic and amplified tone of the guitar. First, amplified with the Prismatone pickup/preamp system. 

Note: These clips were recorded when the guitar was only a couple of weeks old. It's really opened up in the last two months!


And a "quick and dirty"version of Nine Pound Hammer, using both mic (left) and pickup (right).


*     *     *     *

I confess. Sometimes I find myself just peering through the soundhole at my name on the label. (Smells good, too.)


Kirk's workmanship is incredible, and Sam Kennedy's Prismatone pickup and preamp are the icing on the cake. I'll post more clips and photos soon. In the meantime, I'll be playing my guitar . . .

Craig

For more info or to order your own Sand CDM, email Kirk Sand or give him a call at 949-497-5570. 

Sunday, July 21, 2013

Gluing the bridge

I told Kirk Sand about 12-year old me gluing the bridge down on my old Harmony archtop guitar with some glue I found in my Dad's workshop, because it kept sliding around. (The bridge, not the workshop.) Don't worry, I marked the spot before I glued- by cutting a notch in the top of the guitar on each side of the bridge feet with a knife I found in my Dad's workshop . . .

Later, I received these photos, with the caption: "Gluing on your bridge with some glue I found in my Dad's workshop."

First, measuring for the right spot.


A trial run. The ebony block simulates the pickup, for precise placement.


Looking good. Hopefully, Kirk won't mark the spot with a knife he found in his Dad's workshop . . .


Kirk explains: "First we have to chisel away the lacquer where the bridge goes. Better measure twice, chisel once!" If you look closely, you can see the faint lines where he scored the bridge outline before chiseling.


Positioning and taping the bridge into place.


Drilling for dowels and the pickup wire.


Ready to glue.


Next time- the last few construction photos!

-Craig


Sunday, July 7, 2013

Making the fingerboard

One day I received this cryptic email from Kirk Sand:

"I am having a creative moment on the end of your fingerboard. I want you to see this and tell me what you think."


Kirk had the idea of an angle at the end of the fingerboard, to echo the Brazilian rosewood wedge on the back. Here's the original fingerboard template:


Long story short, I thought it was great. Kirk made a mock-up to give me a better idea.


And a full size mock-up, cut from a length of blackboard.


Then, he had another creative moment, this time at my heel . . .


Why not cut the heel at an angle, to match the end of the fingerboard (which echos the Brazilian rosewood wedge on the back)?


I agreed, and here is the result. First, the heel . . .


. . . and now, the fingerboard.


The 12th fret inlay (my initials) came from an idea we tossed back and forth. I like the symmetry of the letters in this font- it looks more like a design than initials.


Here's the mock-up I sent Kirk. (It looked so good, I left it on for a couple of weeks. The further away you got, the better it looked- kind of like me.)


Here's another photo of the actual inlay.


Next time- frets and finish!

-Craig


Tuesday, July 2, 2013

Making the neck

Now, to make the neck. Kirk has the raw materials laid out on his workbench. From left to right, ebony center strips, mahogany neck strips, and in front of Kirk's ledger book, solid mahogany for the headstock.


After the mahogany sides are joined with a center strip of ebony, the solid headstock piece is grafted on. The result- a very strong (and resonant) neck.


Brazilian rosewood face plate #642- that's me!


Now, the face plate is joined to the neck blank.


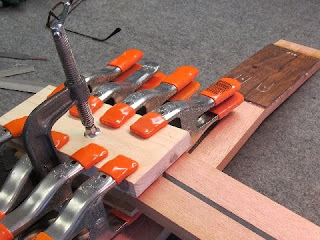
After everything is glued up, it's clamped and put aside to dry.


Uh-oh, it's routing time again . . .


Perfect!


Well, we have a body and a neck. It's starting to look like a guitar!


Next time- more routing . . .

-Craig