Monday, October 14, 2013

New photos

Here are some high resolution photos of the "twin" to my Craig Dobbins Signature Model guitar by Kirk Sand.


From another angle.


A back view of the cutaway. I love the color of the neck, and the contrast of the Brazilian rosewood wedge.


A different angle.


And a closeup of the top. That spruce and cypress is gorgeous!


Kirk is starting two more CDMs. One is already sold, and the second is available for purchase. If you'd like more information, or want to reserve the available guitar, give Kirk a call at 949-497-5570. Or if you prefer, email Kirk.

Thursday, September 26, 2013

Now you can have one too!

I took delivery of my new guitar in July at the CAAS (Chet Atkins Appreciation Society) convention in Nashville. It's incredible!

Here's a video of the first time I played it, in the Sand Guitars display room at CAAS.


And here's a poster from the convention.


The text reads:

• Sitka spruce top
• Mediterranean cypress back and sides
• Brazilian rosewood back wedge and lining
• Brazilian rosewood trim
• Prismatone pickup and preamp
• Schaller tuners with ebony buttons

Here's another photo of the guitar, taken by Kirk himself.


. . . and from the back. Did I mention the Brazilian rosewood wedge?


I recorded a couple of audio clips so you can hear both the acoustic and amplified tone of the guitar. First, amplified with the Prismatone pickup/preamp system. 

Note: These clips were recorded when the guitar was only a couple of weeks old. It's really opened up in the last two months!


And a "quick and dirty"version of Nine Pound Hammer, using both mic (left) and pickup (right).


*     *     *     *

I confess. Sometimes I find myself just peering through the soundhole at my name on the label. (Smells good, too.)


Kirk's workmanship is incredible, and Sam Kennedy's Prismatone pickup and preamp are the icing on the cake. I'll post more clips and photos soon. In the meantime, I'll be playing my guitar . . .

Craig

For more info or to order your own Sand CDM, email Kirk Sand or give him a call at 949-497-5570. 

Monday, August 12, 2013

Installing the preamp and wiring

Kirk and I decided that the lower bout was a good place for the input jack. Looks like "X" marks the spot . . .


Is it too late to change my mind?


Now, on to the Prismatone preamp, which is installed onto the access panel on the back. The preamp doesn't touch the guitar top or inhibit the vibration of the soundboard.


The battery is accessed through the panel as well- no more fiddling around through the soundhole to change a battery!


Kirk says "I love this battery setup! Click the photos quickly, and you'll get a stop-action movie." It's pretty cool, so I decided to make a .gif of the photos. Enjoy!


After connecting everything, Kirk sent me this photo of the finished guitar, front . . .


. . . and back. Beautiful!


Next time- final thoughts, sound clips, more photos, and how to order your own Craig Dobbins Signature Model!

Craig

P.S. If you can't wait, go ahead and email Kirk Sand or give him a call at 949-497-5570. 

Wednesday, July 31, 2013

Last few construction photos

One afternoon I received this very excited email from Kirk Sand: "I just strung it up, and it sounds great! Right away! I can't wait to get the electronics in it!"


Here are a few more photos he sent that day. First, installing the Prismatone pickup . . .


A perfect fit! Kirk fashioned the bridge to receive the Prismatone without the need for intonation adjustment screws.


Now, stringing it up . . .


Beautiful! Kirk used D'Addario ProArte Extra Hard strings, with a Savarez Alliance 3rd string.


Here's a closeup of the bridge/pickup area.


And a view through the access panel.


Looking good!


Now, deciding on the input jack location. Endpin or side?

Next time- installing the preamp and wiring!

-Craig

Sunday, July 21, 2013

Gluing the bridge

I told Kirk Sand about 12-year old me gluing the bridge down on my old Harmony archtop guitar with some glue I found in my Dad's workshop, because it kept sliding around. (The bridge, not the workshop.) Don't worry, I marked the spot before I glued- by cutting a notch in the top of the guitar on each side of the bridge feet with a knife I found in my Dad's workshop . . .

Later, I received these photos, with the caption: "Gluing on your bridge with some glue I found in my Dad's workshop."

First, measuring for the right spot.


A trial run. The ebony block simulates the pickup, for precise placement.


Looking good. Hopefully, Kirk won't mark the spot with a knife he found in his Dad's workshop . . .


Kirk explains: "First we have to chisel away the lacquer where the bridge goes. Better measure twice, chisel once!" If you look closely, you can see the faint lines where he scored the bridge outline before chiseling.


Positioning and taping the bridge into place.


Drilling for dowels and the pickup wire.


Ready to glue.


Next time- the last few construction photos!

-Craig


Thursday, July 18, 2013

Nut and tuning machines

Kirk sent me this fun photo of the stages of making the nut, from the large chunk of wooly mammoth ivory to the finished nut (sitting just in front of the sound hole).


Here's the finished nut, #642.


The nut installed, but not yet notched. Kirk does beautiful work- a real artist and craftsman, down to the finest detail.


And a side view . . .


We decided on gold Hauser-style tuners with ebony knobs, from Schaller.


Here's a test fit. Looks great!


And a closer view . . .


The headstock design, Brazilian rosewood head plate, Schaller tuners, and ivory nut- gorgeous!


Next time- gluing the bridge!

-Craig

Monday, July 15, 2013

Buffing and sanding the finish

So, how does Kirk Sand finish a guitar? I'll let Kirk tell you:

"I apply 4 coats (of lacquer) and then sand with 600 dry paper. Then I spray 4 more coats, and sand again with 600 dry."


"I then spray 4 last coats and let it dry for as long as possible. That isn't easy when you have a show coming up in 3 weeks."

Note: That's 12 coats, folks. 


"So, after sanding the lacquer finish all the way up to 2000 wet, I buff it out on my miracle buffer."


Here's a closeup of Kirk's buffing wheel.


And one more photo of Kirk at work. Notice the blue tape to protect the fingerboard.


The result- a beautifully finished instrument, front . . .


. . . and back.


Next time- nut and tuning machines!

-Craig

Saturday, July 13, 2013

Making the bridge

While the first coat of lacquer is drying, Kirk turns his attention to the bridge . . .

"Any ideas on the shape?" he asked me. My ideas were something along the lines of John Knowles' bridge, but with swept wings to echo the angled fingerboard and heel, and the Brazilian rosewood wedge on the back. "I'll think on it," said Kirk. "The ends of the wings can be traditional square flat on the ends. I curved John's in a little. I'll play with curving the ends the opposite way."

Here's John's bridge:


And here's the rough drawing I sent to Kirk:


A couple of days later, I heard from Kirk. "It came to me in one second today. What do you think?"


"It is similar to John's, but not the same. It has the straight ends like your drawing. It mimics the other lines on the guitar too!" (That's the Prismatone pickup next to the Brazilian rosewood bridge blank.)


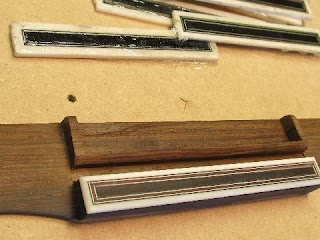
I gave Kirk the go ahead, and he went to work. First, he created an inlay for the tie block, using the same scheme as the soundhole ring and binding.


The finished inlay, ready to install . . .


. . . and a closer view.


Done! The tray will receive the Prismatone pickup.


Now, Kirk lacquers the bridge . . .


. . . and sets it aside to dry.


Next time- buffing and sanding the finish!

-Craig